As we get ready to import our audiobook CDs into iTunes, it’s a good time to decide on the audio quality settings we want to use. The default music settings in iTunes work well but those settings give us very large audiobook files that take up unnecessary hard drive and precious iPod space without adding anything to our listening experience. iTunes is geared towards ripping music CDs not audiobook CDs and our audiobooks don’t require the higher quality settings that music does.
As a rule I like to go by Audible’s standards for the quality settings when importing audiobook CDs into iTunes. I don’t have a technical understanding of what a bit rate is or what kbps stands for so these examples are to help us put this point into perspective.
- Audible’s Format 4 audiobook downloads are delivered at 32 kbps – personally I was completely satisfied with the sound quality of this format and was disappointed when Audible required those who wanted to use Whispersync to download in the e format.
- Audible’s e or enhanced audiobooks are delivered at 64 kbps meaning the audiobook files are double the size of Format 4 taking up twice the space on both your computer and iPod yet the average listener hears no difference in the sound quality of the audiobook.
- iTunes’ default CD import setting is 128 kbps which would make your audiobook files very large at four times the size of Audible’s standard Format 4 with the point remaining – no noticeable difference in listening quality.
- Music purchased from iTunes is delivered at 256 kbps – as stated earlier music standards don’t apply to audiobooks so adding this here is for comparison purposes only.
Now that I’ve made my case for adjusting your iTunes settings when importing audiobooks, here are the easy to follow steps for those with Windows 7 – I’m working on adding Mac steps… You need only make this adjustment once as iTunes will save these changes as your new default import settings.
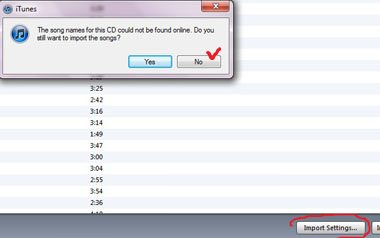
Open iTunes, insert an audiobook CD, and you will see this window come up once iTunes recognizes the CD. You will click on No at this prompt. Then go down to the bottom right and click on Import Settings as partially circled to in red.
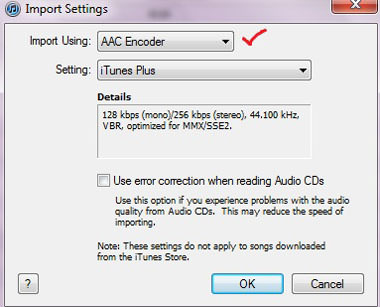
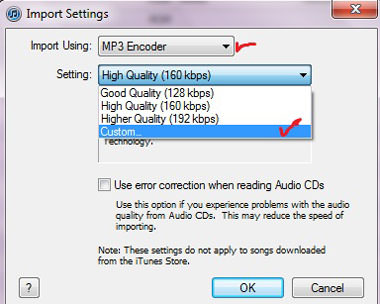
This is the box you will see, click on the down arrow in the first box – Import Using: – for the drop down menu to appear and choose MP3 Encoder as seen in next screen shot
Now that MP3 Encoder has been chosen click on the Setting: down arrow to show the next drop down menu and click on Custom
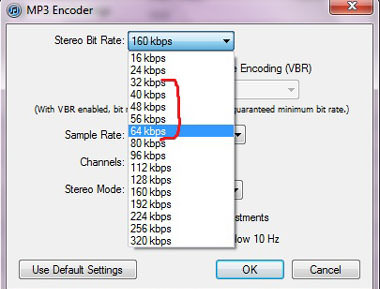
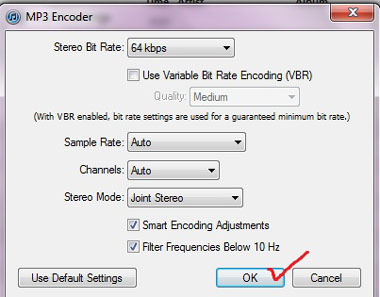
You are given many options to chose from and the ones within red all work well with audiobooks. I now go with 64 kbps ie: Audible
After choosing your preferred kbps click OK at the bottom of the box
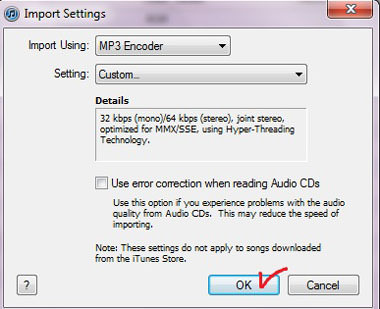
Your Import Settings window will now look like this and you will click on OK again to confirm your audiobook quality setting
These changes will be your CD import default settings and will remain at this quality level so if you want to rip music CD’s you’ll want to adjust them to higher standards. But for now, it’s time to import your audiobook CD’s while making sure each disc imported is tagged correctly afterward.
Tagging is THE most important step in making sure each of your new audiobook files (discs) play in order and auto resume when added to a Playlist on your iPod. I will detail that process in our next screen shot Tutorial…
Brenda




1 thought on “Audiobook CD Import Settings for iTunes”
Comments are closed.